Annotations
Annotations are a great tool and a marketing strategy for boosting interactivity and sales. Through assigning a simulation of a real-life experience to a clickable Hotspot, the user's enthusiasm is enhanced, along with a potential for a bigger engagement with the product. The Threedium Platform features numerous Annotation setup options that enable immense presentation capabilities.
Introduction
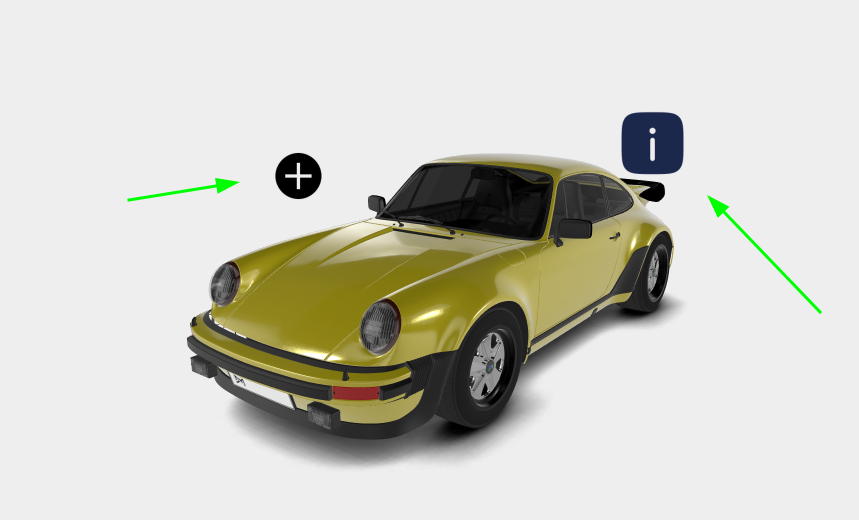
Annotations are an essential part of creating more levels of interactivity between viewers and the scene. In the Threedium Platform, they are widely practiced and employed to provide more information on the 3D product, either via a pop-up text of a sort, or via some change in the scene’s appearance that can highlight a product typology, some of the product’s real-life features, or just bring about a bigger sense of understanding of the product itself. Creative possibilities of using annotations to present a product are endless.
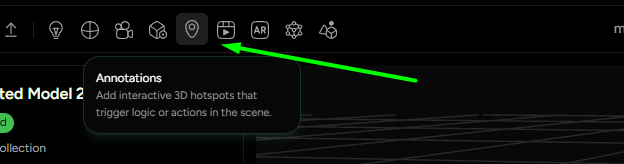
On the Threedium Platform they can be accessed by clicking on the Annotations button with a
tag icon on the Main Ribbon (Figure 1).
Settings
In the left-side Editor workspace, Annotations Name bar will appear with a + button next to it
(Figure 2.). There, the artist can add an annotation to the scene.

Annotation is always parallel to the viewing plane of the camera’s lens and is two-dimensional.
Annotation primary settings include (Ordered as marked in Figure 3.):
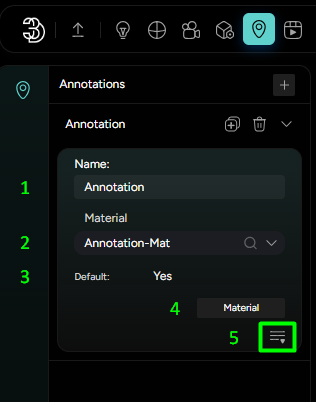
Annotation Name- Sets the name of the Annotation;Annotation Material- Searches a desired material (Sprite) to be applied to the Annotation;Default- Sets the chosen material as a Default one;Material- Takes the User to the Sprite* menu of the Material Tab;Expanded Annotation Settings- Settings with more complex and refined adjustments that establish the Annotation’s Scene appearance (will have a dedicated section).
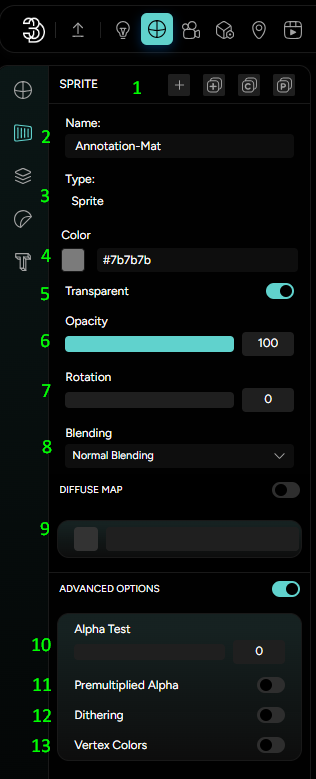
Sprite is a 2D image in a larger Scene, and in Threedium Platform, it is associated with Hotspots, thus getting its own dedicated section as a special-case Material in the Vertical Material bar.
Sprite’s adjustments include (Ordered as Marked in Figure 4.):
Bar settings- Add, Clone, Copy, Paste settings;Sprite Name- Sets the Material name for the Annotation/Hotspot;Type- States the Material type (always a Sprite);Color- Sets the Sprite color;Transparency- Sets the Transparency property of the Sprite;Opacity- Sets the Transparency degree of the Sprite;Rotation- Sets the rotation angle of the Sprite image;Blending- Sets the Blending mode of the Sprite (No, Normal, Additive, Subtractive, Multiply, Custom);Diffuse map- Allows slotting in a Diffuse map image of the Sprite (.png, .jpg, .jpeg, .gif, .hdr), and enables all the corresponding expanded Map settings for it;Alpha Test slider- Softens the alpha channel border of the image;Premultiplied Alpha toggle- Masks the color image by multiplying it with the alpha channel;Dithering toggle- intentionally applies a form of noise used to randomize quantization error, preventing large-scale patterns such as color banding in images;Vertex Colors toggle- Enables inherent vertex color properties.
Expanded Annotation Settings
-
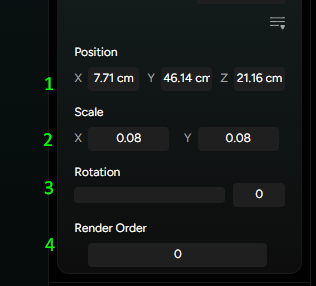
Its Position and Scale (Marked with “1” and “2” in Figure 5.) can be adjusted by expanding the Annotation Primary settings and manually inputting the x,y,z coordinates for the Position and x,y factor for the Scale along the chosen axis.
-
The Position can also be manually adjusted with more control via standard Move tool - by clicking on the desired Annotation and then pressing the keyboard shortcut “W”, which enables the move gizmo.
-
The Rotation slider (Marked with “3” in Figure 5.) will adjust the annotation’s rotation in relation to its midpoint.
-
The Render Order input (Marked with “4” in Figure 5.) will inform the U3D Renderer in which order to display the Hotspot in relation to other elements in the scene. For a reference, the default value of the Render order is “0”. Anything above that will be rendered as if it was in front of the element - zero and anything below that will render as if it is behind the element - zero, regardless of the coordinates in the Scene.
Closing Words
Annotations open up countless possibilities for User-Product interactivity. The most common practice is binding Actions and Animations to Annotations as triggers. The best advice we can give is having fun and experimenting with different creative approaches to achieve the best click-to-action result. Combining the life-like introspection of 3D with digital button-accessibility creates a mesmerizing user experience.