General
Creating Materials
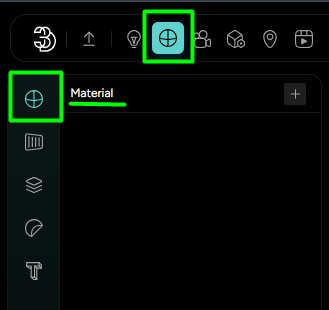
To create a new material, navigate to the Materials tab and click on the first icon in the left panel. This opens the main material panel. Click the plus + icon to add a new material. Once created, a wide range of customizable settings becomes available.
Properties
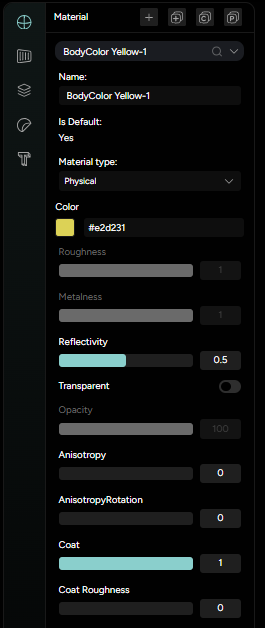
Naming the material- The first step is to name your material. Since a workspace may contain many materials, we strongly recommend using a consistent naming convention to keep everything organized.Basic properties- Color picker - choose the base color of your material.
- Roughness - controls how smooth or rough the surface appears.
- Metalness - determines how metallic the material is.
- Reflectivity - adjusts how reflective the surface is.
- Transparent (toggle) - enable or disable transparency on the material.
- Opacity - adjusts the transparency level when enabled.
Advanced surface controls- Anisotropy - controls the stretching of reflections across the surface - useful for brushed metals and similar effects.
- Anisotropy rotation - rotates the anisotropic direction.
- Coat - adds a clear coat layer on top of the material.
- Coat roughness - sets the roughness of the coat layer.
Emissive properties- Emissive color picker - sets the color of self - illumination.
- Emissive intensity - controls how strongly the material emits light.
Render sides & BlendingLighting & Environment maps- Global AO map - enables the use of a global ambient occlusion map on the material.
- Global environment map - enables the global environment lighting to the material.
Volume and subsurface options- Attenuation distance - controls how deep light can penetrate translucent surfaces.
- Attenuation color picker - defines the color light fades into as it passes through the material.
- Transmission - controls how much light passes through (used for glass-like materials).
- Thickness - simulates how thick the object is for light transmission.
Sheen and specular properties- Sheen intensity - adds a soft fabric-like glow to the surface.
- Sheen color picker - defines the color of the sheen layer.
- Sheen roughness - controls how diffused or glossy the sheen is.
- Specular intensity - adjusts the strength of specular reflections.
- Specular color picker - changes the tint of the specular highlights.
Texture maps
Texture maps can be applied directly within the Material Settings panel. These maps allow you to control specific visual aspects of a material by using image texture instead of flat values.
Diffuse map
The diffuse map is used to define the base color texture of your material. Instead of selecting a solid color, you can upload an image texture that wraps across the surface of your 3D model.
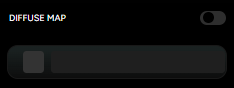
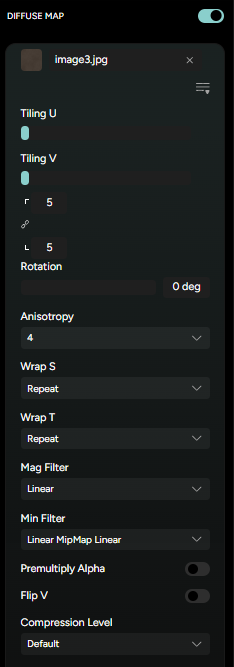
Enable toggle- activates or deactivates the diffuse map.Upload slot- click to upload the desired texture image.Texture info icon- displays details such as image dimensions and file size.Expanded settings- click the three horizontal lines under the texture slot to open advanced configuration options:Tilling U / Tilling V- set how many times the texture repeats horizontally and vertically.Rotation- adjusts the texture’s angle.Anisotropy- improves clarity when viewing the texture at glancing angles.Wrap S / Wrap TMag Filter / Min FilterPremultiply Alpha- corrects blending for textures with transparency.Flip V- flips the image vertically if required.Compression level- adjusts texture compression for performance or quality.
Roughness map
The roughness map controls how shiny or matte the surface appears by using a grayscale image - white areas represent rough surfaces (diffuse reflections), while black areas appear smooth and glossy.
Just like the Diffuse map, it includes:
Enable toggleUpload slotTexture info icon- Expanded settings with tilling, rotation, wrap modes, filtering options, compression level and more.
Normal map
The normal map adds fine surface detail by simulating small bumps and grooves without modifying the actual geometry.
Enable toggleUpload slotTexture info iconIntensity- controls the strength of the normal effect.Flip green channel- flips the Y axis of the normal map.- Same advanced settings as the Roughness map, such as tilling, wrapping modes, filtering, and compression options.
Bump map
The bump map simulates surface depth and texture using a grayscale image, creating the illusion of relief without changing geometry.
Enable toggleUpload slotTexture info iconScale- adjusts the strength of the bump effect.- All other settings are the same as the Roughness map
Environment map
This map allows you to apply a localized reflection environment to a specific material, giving it a unique reflective look independent of the global environment.
Enable toggleUpload slotTexture info iconIntensity- controls the strength of the environment reflectionUV channel dropdown- select between UV channel 0 or 1- All other settings are the same as the Roughness map
In addition to the maps listed above, there are many more texture maps that can be uploaded depending on your material needs. Most of them follow the same or very similar settings, ensuring consistency and ease of use across the platform.
Advanced options
Located below the texture maps section, the Advanced options panel provides deeper control over how a material is rendered. These settings are ideal for fine-tuning visual behavior, handling transparency, and solving rendering issues.
Wireframe- renders the mesh as a wireframeAlpha testPremultiplied alpha- uses premultiplied alpha for blendingDithering- reduces banding in transparent or gradient areas.Depth writePolygon offsetColor writeVertex colors
Copy, clone, paste materials
Efficient material management is crucial for working across multiple objects and keeping your workflow smooth.
Here’s how each action works:
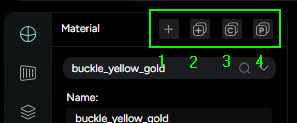
Clone material- cloning creates an exact duplicate of the selected material (2.). The cloned material has a “-1” suffix added to its name.Copy material- First, select an object that already has the material you want. Click Copy icon (3.) to store the material’s settings.
Paste material- After copying a material, select another object, click Paste (4.), and the material will be applied to that object.
Managing material library

Assign Material
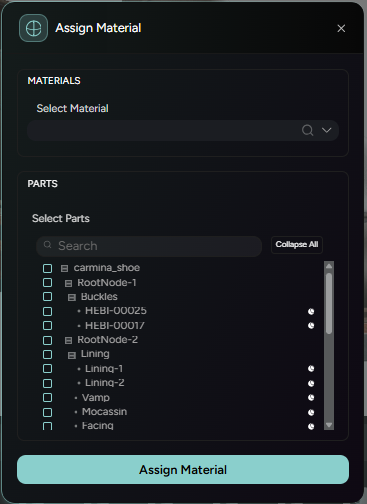
Clicking on Assign Material opens a window where you can:
- Select a material from the library.
- Below the selection, you’ll see a list of parts or objects - simply check the ones you want the material to be applied to.
- Once everything is selected, click the assign material button at the bottom of the window, and the material will be applied to the chosen parts.
Clone Materials
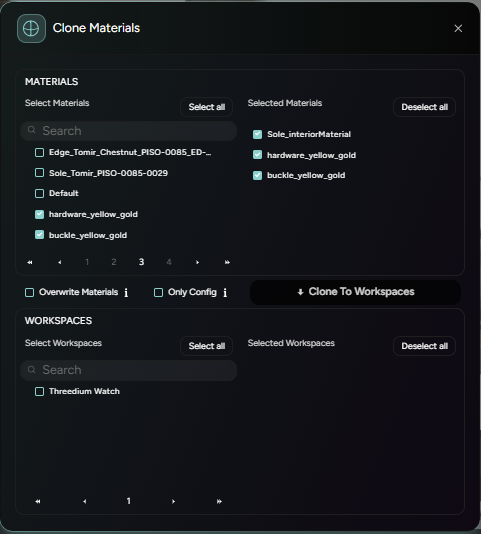
Clicking on Clone Materials button will open a new window where you can:
- Select multiple materials to clone. The selected material will be listed on the right side of the window.
- Choose one or more workspaces where you want to clone these materials. These workspaces will also appear on the right.
- In the middle section, there are two important options:
- Overwrite materials: if checked, existing materials in the selected workspaces will be overwritten. This action is irreversible.
- Only Config: if checked, only the material’s configuration (e.g.,color, roughness, metalness) will be copied - textures and assets will not be cloned.
- Once everything is set, click
Clone To Workspacesto complete the action.
Import Materials
Clicking on the Import button opens a new window where you can:
- List assets from other workspaces within the same project as the current
- View a list of saved materials from other workspaces.
- Simply select the material you want to bring into your current workspace.
- Once selected, click the
Load Materialbutton, and the material will be imported and ready to use.