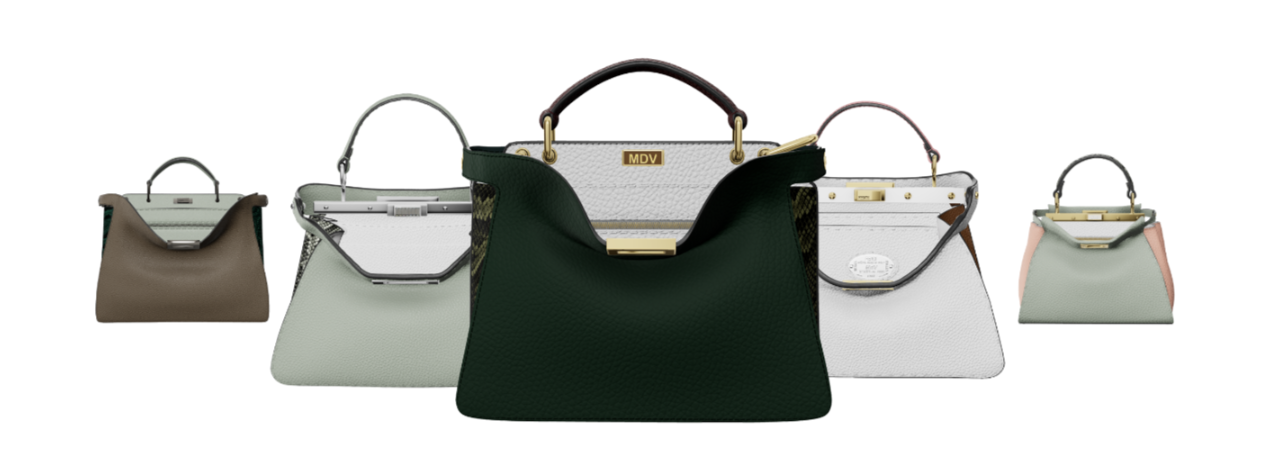
Bags
In this document, we specify all the necessary properties of 3D assets for the Bag category that are required to be eligible for use within the Threedium infrastructure.
General guidelines for modeling
Formats
Threedium Platform is compatible with GLB, FBX and OBJ file formats.
- GLB is a good starting point, Threedium Platform is using GLTF standard as well, so this workflow should provide a seamless experience.
- FBX can still carry materials and necessary textures together with geometry, but due to different versioning of FBX files, some differences may occur.
- OBJ format can be uploaded with a .mat file as well, to load the necessary textures and material information.
Asset file size
- The optimal file size should be up to 10mb for e-Commerce workspaces. This should be a good size to aim for, but depending on the project specification this can be specified additionally.
- Assets that are done without textures (configurator specification) should be under 5 MB.
- Texture sizes should follow an average. Ex. If 10 textures have a range of 2-5mb and then we have a texture map of 10mb, it should be optimized to fit in the average range.
Geometry
- In most cases, open and closed variants of bag assets are needed. This can be achieved by animating the bag to open or close as well. This is project-specific and is going to be determined before the asset creation starts.
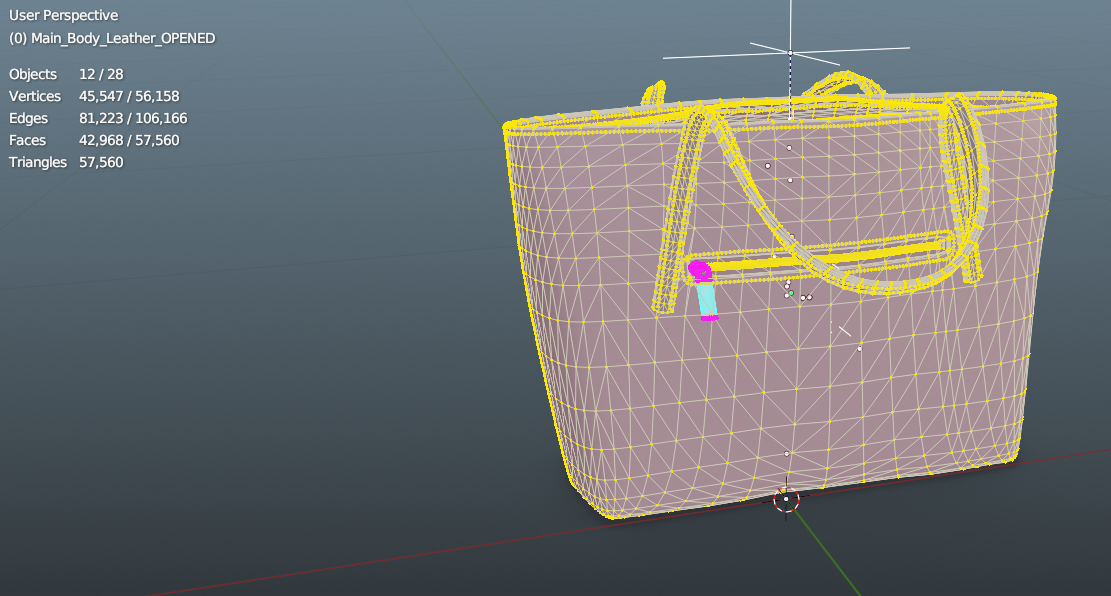
- No n-gons are allowed, either quads or triangles should be used to ensure good topology and any possible edits in the future.
- Good flow of topology, no sharp creases, sharp angles, or polygons protruding through the backside.
- The thickness of the leather should be realistic, refer to reference images for this.
- Subdivision should be done as a last step, reversing this effect can help if optimization is needed. Keep in mind that these assets are going to be used across the spectrum of Web3D integration (viewers, configurators, AR, banner ads)
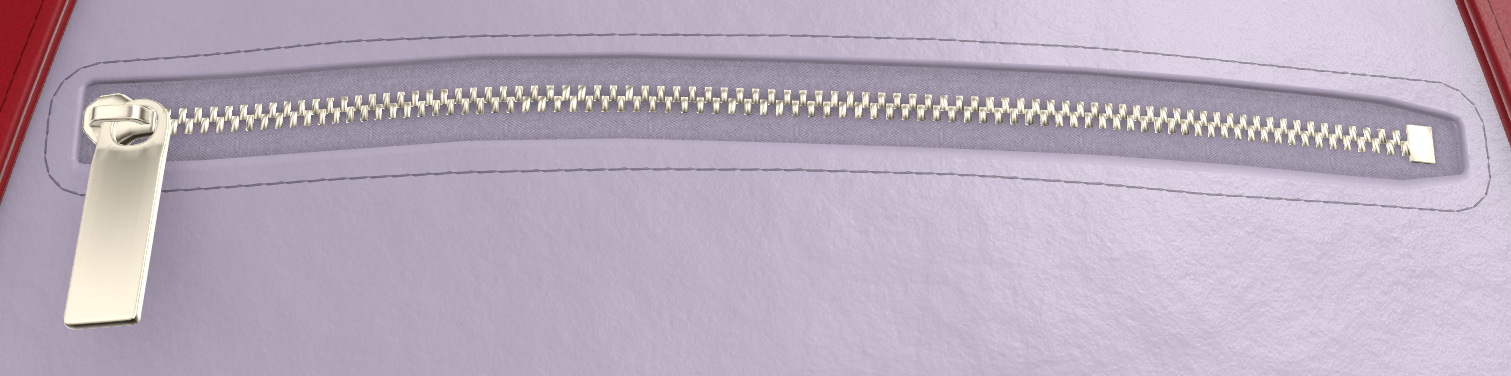
- Zipper pullers are preferable to be modeled, but depending on the specific project and technical requirements from chapter 1.2 this can be discussed before asset creation begins. Good practice would be to wait for the first round of client feedback as well.
- Clasps and other hardware elements that are used for attaching/detaching the belts, handles, tags or other elements, should be modeled in a way that they can be animated later. Proper detaching of geometry and correct placement of the pivots are crucial for these parts.
- Belts, straps, and other parts that overlap and fold into themselves should never have geometry overlapping. They need to be modeled or simulated in a natural position, by touching surfaces, but not protruding through geometry.
Polycount
- Since we are using webGL we are limited in terms of performance and we need to spend some time to optimize the assets correctly. Polycount is an important parameter that should be considered when creating assets. They should be easily optimizable in case that we need to reduce the polycount.
- Preferred triangle count for watch assets can be categorized by their complexity:
Tier 1- up to 30 000 trianglesTier 2- up to 60 000 trianglesTier 3- up to 130 000 triangles (best performance/quality)Tier 4- up to 400 000 triangles (for extremely complex or unique assets, a good example would be a Bag with a chain strap, or quilted leather).
Detaching/separating parts and grouping
- The number of mesh nodes should be kept to a minimum.
- Closing mechanisms, clasps, zippers, and other parts that serve a function for asset operation in real life, should be separated and their pivots reset to logical centers (center of rotation). This is required for animating these parts in Threedium Platform.
- Any crystals, diamonds, or other geometry parts that are meant to have “Diamond shader” applied, need to be separated and grouped. Each diamond shape needs to be a separate geometry part.
- Parts that are not specified for animation can be grouped by material type, ex. “hardware_partname_1”.
- All part groups should have their empty node to which they are parented.
- Avoid parenting parts to another geometry part, this creates issues in later integration.
Naming parts, groups, and files
-
This chapter can be project-specific, and depending on the final use case (viewer or configurator) it can vary in some aspects. Here are some general guidelines that apply to most projects.
-
The naming convention is immensely important, and our QA has a zero-tolerance policy for this specification. Any assets that have auto-generated names ex. (mesh 001, object 345, etc.) and that do not have logical naming, will be returned for edits.
-
Names should be logical, and easily understandable. They should state, one of these properties for easier identification:
- Material type
- General Shape
- Color (if the part is available only in one color)
- Location (top, bottom, left, right, middle)
- Type of shader (Fur, Transparent)
-
Part can contain only one piece of information or multiple combined. In a practical example:
- SKU123456
- handle
- metal_zipper
- interior_lining_open
- metal_pads
- base_leather
- SKU123456
-
Naming of empty nodes should also follow the same logic, it should better describe which parts are contained in the group.
-
File names should always have SKU_123456 format
-
Planes that represent shadow on the floor, should always be named “shadow_plane”
-
Parts that need to have special shaders assigned should have the name of the shader within them, and need to be grouped ex. “diamond_small_1” or “fur_collar_inside”
-
Asset name should always be either an SKU or if we do not have an SKU, then the name of the product. It can contain lowercase and uppercase letters and numbers. No special characters.
-
Part and group names should follow a simple logic, using underscores instead of space to connect the string of text. Names can contain only lowercase letters and no special characters.
-
Groups need to contain two pieces of information:
- name, of the specific part of the asset it contains
- name of the material type
Transformation data and scale
- Before submitting the asset, please make sure all transform data has been applied/reset.
- The model needs to be centered in the scene on the X, Y, and Z axis origin. The rotation, transformation, and scale of the complete object and all its geometry parts need to be 0.
- The scale of the model should be 1 on all axes. This is of great importance since assets are used in the AR environment, we need the real-life scale for all the assets.
- The native dimensions format for Threedium Platform is cm (centimeter).
- The bag should always be facing forward in the scene.
Stitching
- Depending on the particular SKU, stitching can be either baked into a simple geometry strip, or they can be actual 3D objects with each individual stitch.
- When using the “geometry strip” method, keep in mind UV unwrapping, see the next chapter for more information.
- For 3D stitches, aim for the lowest polycount possible
UV Unwrapping
General UV guide
- Ensure consistent texel density, unless otherwise specified by the project requirements.
- GLTF divides the asset along UV seams, and when the camera is observing from a long distance, UV seams can be seen. UV seams should be hidden when possible.
- UV islands should have no stretch or compression, in order to avoid loss of quality in textures. Recommended distance between UV islands:
- for 512x512 - 4px
- for 1024x1024 - 6px
- for 2048x2048 - 8px
- UV islands should not touch the borders of the UDIM tile
UV channels
- Channel 1 is reserved for standard mapping of material textures.
- Channel 2 is reserved for light and ambient occlusion maps.
- Every asset should include channel 2, which will contain a completely unwrapped asset on one UDIM tile. This is used for baking AO map that will be used as a Global AO map. This map is applied to all the parts of the asset regardless of specific materials.
- Multiple UDIM-s are not supported.
Unwrapping for tileable textures
- Preparing the UV-s for this kind of workflow, we need to first take into consideration the point above (2.2). Channel 2 = AO map.
- Channel 1 is now free to create a consistent UV space for applying tiled textures, such as fabrics.
- For tiled textures, UV transforms for all UV islands should be U 0.5 and V 0.5. This way we ensure that texture starts from the same point of the asset. UV islands should also have the same average scale, no different scale is allowed. This is easily checked with UV checkered texture. Please ensure this criteria is met perfectly, assets with incorrectly setup UV-s will be returned for edits.
Unwrapping for custom textures
Using Substance Painter is the most common way of creating materials and textures. We accept any other software, as long as texture maps are properly baked, and have highest highest-quality details.
Stitching unwrapping
- All the stitches on the asset should have identical UV mapping. There are two ways to go about this:
- Split all the stitching geometry in individual polygons, stack them in the center of UV space, and then scale them using a stitch texture so they fit in an appropriate manner and are displayed correctly on the model.
- Unwrap and straighten the stitching geometry in a continuous strip that is aligned properly on the first UDIM tile, so the stitches are tiled in a correct scale.
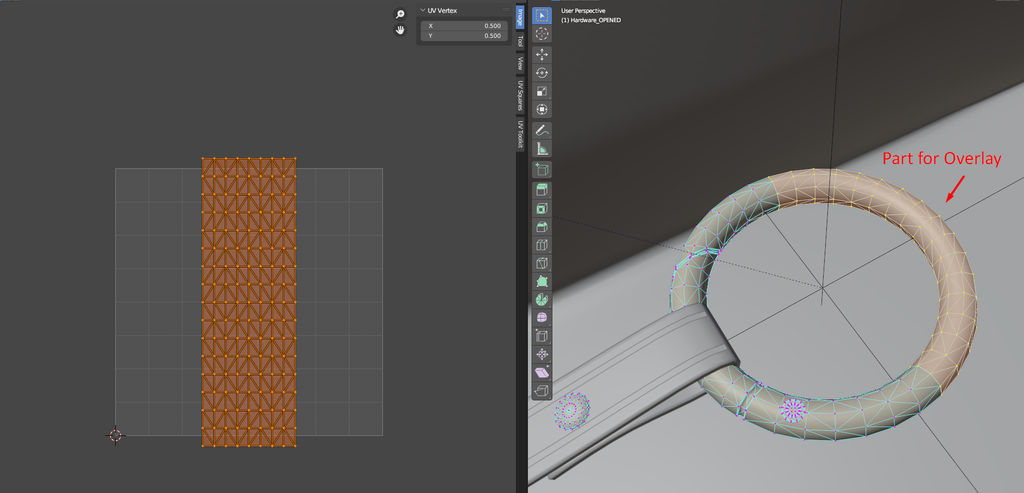
Unwrapping for overlays
- Overlays are a feature on Threedium Platform that lets us render either, custom text or images on our asset. This system uses UV coordinates to do so.
- SKUs that have specified parts for engraving, embossing, or other types of customization by the end users, need to have those parts unwrapped in a specific manner to allow for easy overlay set up in Threedium Platform.
- This part should have centrally positioned islands since overlays are by default positioned on U 0.5 and V 0.5 coordinates. The idea is to have as small several transforms as possible to achieve the desired result.
- In cases where assets have custom texture, overlays should be considered at the beginning of the unwrapping workflow, so they can be positioned properly.
Unwrapping for embossing-engraving
- When using tileable materials, there are two ways to achieve logo engraving, either using our overlays system, or increasing the density of mesh in that specific area, and using vertex displacement to engrave the details into the geometry. Later baking of the AO map will ensure that shadows accent the specified logo/inscription.
- When Unwrapping this area, be extra careful to not disrupt the seamless flow of textures, while keeping stretching/compression of the UV island to the lowest possible minimum.
Unwrapping for Diamonds and Precious Stones
- Diamonds do not require any unwrapping since our special shader works using geometry information. However, it is a good practice to do a simple unwrap and stack the diamond islands in the same position. This is very useful for us when the asset needs to be used outside of Threedium Platform.
- For metal parts, UV needs to comply with the same logic as for point 2.4, since it is likely that some metal parts will have an engraving feature added through overlays.
Materials
General Textures guide
- Texture size should not go above 2048x2048. Higher resolutions can impact performance on mobile devices.
- All textures need to be in the rules of 2. Ratios of the textures should be either 1:1 or 1:2, 2:1 3:1 etc… Here are some examples of some accepted texture formats:
- 512x512
- 1024x1024
- 2048x2048
- 1024x2048 (1:2)
- 512x1024 (2:1)
- We recommend keeping the texture ratio to 1:1, and using other ratios only when unavoidable.
- We support PNG, JPG, and HDR textures. PNG can contain transparency and it will be applied once the texture is applied in a diffuse color map slot.
- Normal maps should be kept in PNG format, converting them to JPG will result in a loss of subtle details
Decals and floater objects
- Make sure that floater planes are offset enough from the geometry part to avoid the “z-fighting” effect
- For shadow textures, use Alpha map to ensure a good quality of blending with the background
- For blending modes use Alpha Clip, or Alpha Blend
- Group all the logo/branding on one set of textures if possible
Branding and logos
- Logos/branding should have the highest possible quality, we recommend one texture set in 512x512 image size
- If there is a need for higher-resolution textures we suggest breaking up the logo/branding into multiple texture sets, especially if they cover a large portion of the model.
- If SVG files are not available we suggest recreating them and using them as a base for logo/branding textures.
Ambient Occlusion maps
- Some bag assets will need to have both open and closed versions. This should be taken into consideration since the AO map will differ between the 2 versions.
- When the bag is opened and closed using animations, real-time shadows will be used, but it is good to have AO details. Interior AO details should be light enough as if the interior is presented in an illuminated environment.

- Global AO maps should have a 2048x2048 resolution, individual maps, can have lower resolutions if they are done for specific parts of the asset.
Reusable texture format
- We prefer tileable texture formats, that can be shared across multiple assets
- Use custom-baked textures only for unique assets or parts
- Every tileable texture set should have a Normal, Metalness, and Roughness map. Diffuse can be controlled by color parameters, especially if there are color variations for that material.
- Only polished metal materials do not need additional textures. hey are set up in Threedium Platform using only the Environment map and base color.
- Material for zippers and other metal details should be the same, this ensures the usability of an asset in configurable scenarios.
Stitching material and textures
- Stitching textures should be uniform across the same brand assets. They can differentiate between styles, but within the same style, we should have an identical texture set, and only the color parameter should change.
- Over thick stitching should have a unique tileable texture set with a realistic randomized thread pattern.
- Pipe stitching should have sufficient geometry so that no sharp angles are visible directly in the silhouette of the asset.
Transparent materials
- For transparent parts of the mesh, we support alpha, transmission, and thickness maps.
- Coat and coat roughness (maps or integer) can add more details to otherwise flat-surfaced materials.
- For glass or crystal parts, use offset double mesh to make the object appear thick.
Animations
Here we list a few tips and recommendations for the preparation of animation sequences for Threedium Platform.
- When working on files, keep a consistent file format. At the start of the project, one format should be chosen and used across all SKUs, GLB or FBX.
- The rest poses for FBX and GLB have different meanings. FBX will export the current pose in the frame as “rest pose” while GLB will export the actual rest pose that is already saved, or predefined.
- Animated SKU should be delivered in original file formats, preferably Blender, but we accept Maya and 3D Max as well.
- Both animated transforms, and animations with rigs are accepted.
- Total number of bones in a rig is recommended to be up to 65. This is item-specific and not always applicable, but the general idea is to avoid using unnecessary bones and weight-painting multiple parts to one bone where possible.
- Adding new bones, or deleting old ones, from the rig should be avoided if possible. When using the Update feature on the platform, this can cause issues.
- Rest pose is recommended to always be the same, changing it, can cause issues when updating the model in Threedium Platform.